
The other grannie in the tale
Last, but hopefully not least is the other grannie from the tale, Comfy Grannie.
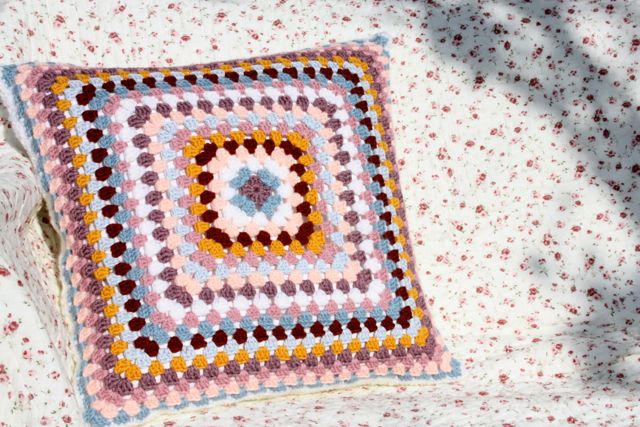
I'd already started the Giant Grannie at this stage and I thought that the matter of choosing colours for this cushion was so easy. I picked out the ones that went best with my chair, my favourites, the ones I thought looked the very bestest and I dashed off a granny square pronto.

Backs are no trouble for me these days. Gone are the days of agonising over finding suitable material and dragging the sewing machine out. A little part of that is because I have a dedicated sewing table these days, but the big part of it is, because now I crochet my backs, instead of sewing them.
If you were reading last year, and recall the days of Diagonally and Elmer the Cushion, then you'll know that I found this new method a revelation. In fact, I still do.
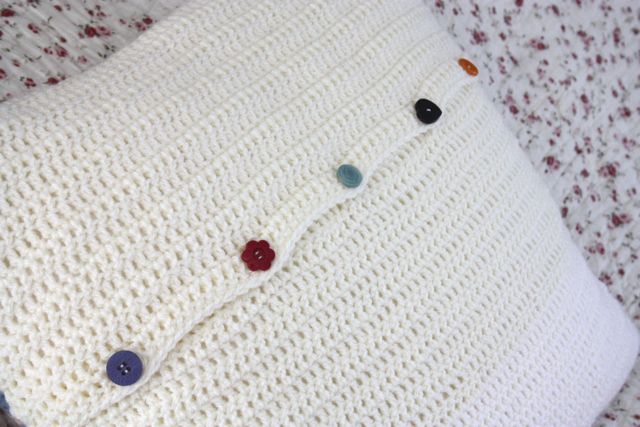
Not least because you don't have to make any button holes or line the buttons up to sew them on or anything, you can just use the natural holes in the crochet.
Actually, somebody did comment back then that they would be interested in knowing how I attach these backs, as I crochet them directly onto the fronts rather than make them separately and sew them together afterwards. I was thinking a little tutorial may be order. Any takers for such a scheme?

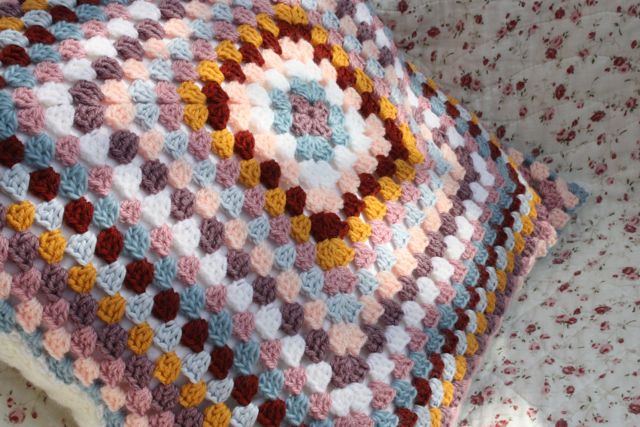

Strangely though, after picking all my favourite colours, I don't like the finished effect as much as I thought I would. It's so odd how things work out. My Giant Grannie blanket colours I worried over, doubted myself, chopped and changed and I ended up loving it.
For this Comfy Grannie cushion, I thought I knew what I was doing and thought it'd be fabulous and I ended up... quite liking it. I mean, it's nice and all but... just that, nice.

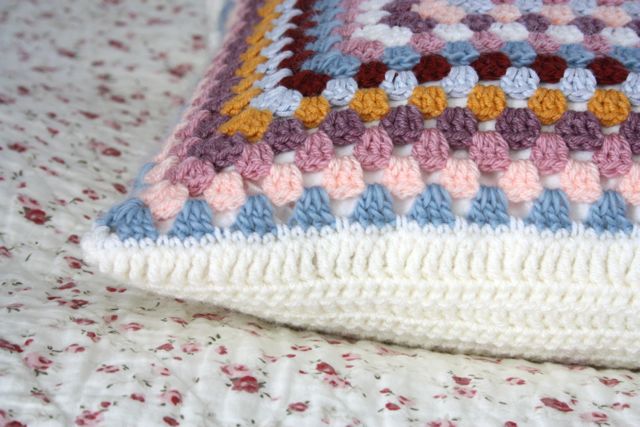
Still it is comfortable for a bit impromptu outdoor crochet after my amateur photo shoot. I was just working on the border of my Giant Grannie here. Very nice work for in the sun, I had to crochet without getting the blanket on me!

I wanted a couple of cushions to make my new chair as comfy and cozy as possible. So while the Great Grannie Madness was upon me, it made perfect sense for the first cushion to be a granny square too.
I'd already started the Giant Grannie at this stage and I thought that the matter of choosing colours for this cushion was so easy. I picked out the ones that went best with my chair, my favourites, the ones I thought looked the very bestest and I dashed off a granny square pronto.

If you were reading last year, and recall the days of Diagonally and Elmer the Cushion, then you'll know that I found this new method a revelation. In fact, I still do.

Not least because you don't have to make any button holes or line the buttons up to sew them on or anything, you can just use the natural holes in the crochet.
Actually, somebody did comment back then that they would be interested in knowing how I attach these backs, as I crochet them directly onto the fronts rather than make them separately and sew them together afterwards. I was thinking a little tutorial may be order. Any takers for such a scheme?

Did you also notice in that first 'back' photo up there, my obvious mistake? Have a close look at the bottom right. See it? Yep, a rather unattractive mismatching of cream yarns. Not good.
I really should have thought about it before I started because I was using up some old Bonus DK cream and I only had a little left. When I run out I merrily carried on with my usual Stylecraft Special cream and didn't really notice the difference in the cozy glow of the evening lights. Hey ho, it's on the back, I really am struggling to worry too much about it.
I just thought I'd share though, because we all want to take lovely pictures of our crafting and with careful and selective photography it can be easy to make things look perfect. So, if all you ever see is photos on a blog you can be forgiven for thinking that other people's things really are all perfect. But they're not. They're real and real is rarely perfect, especially if you are a lazy toe-rag like me who can't always be bothered to fix mistakes!

I also decided not to do an edging round like I would usually. I felt that it looked neat enough that I could get away with it and the couple of edges I did try didn't seem to suit. So there it is, the naked, un-edged edge.

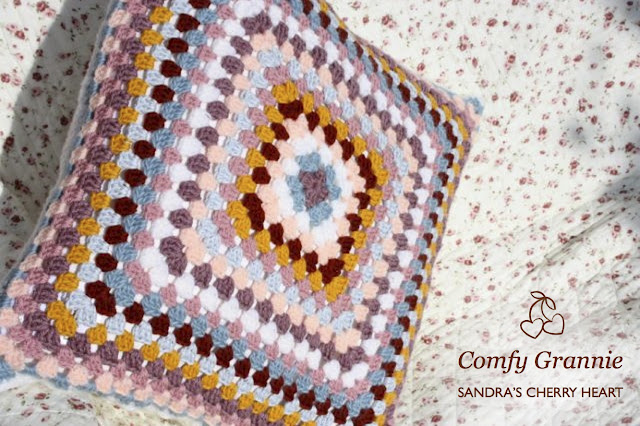
So let's see the whole thing...
And here it is in it's home, my chair.

So let's see the whole thing...

And here it is in it's home, my chair.

Strangely though, after picking all my favourite colours, I don't like the finished effect as much as I thought I would. It's so odd how things work out. My Giant Grannie blanket colours I worried over, doubted myself, chopped and changed and I ended up loving it.
For this Comfy Grannie cushion, I thought I knew what I was doing and thought it'd be fabulous and I ended up... quite liking it. I mean, it's nice and all but... just that, nice.


Don't forget to let me know if you think a 'cushion back' tutorial would be useful...
S x
Oooh. Cushion back tutorials... always appreciate it! As well as a tutorial for sewing on a fabric back, that seems hard too I have to say!!
ReplyDeleteGreat work on this pillow though. I understand the whole feeling 'okay' about something that you'd think you'd love, nasty huh!
Esther.
A tutorial would be fab! Im ok doing rounds but the square backs are a new one for me!
ReplyDeleteI have given you a blogging award! Come check out the details at my blog: http://tecrin.blogspot.com/2012/04/i-received-blogging-award.html
ReplyDeleteI actually prefer a naked unedged edge on my cushions ... it's lovely Sandra, like me you sound as if you're more critical of the imperfections in your own work than others would be
ReplyDeleteThis comment has been removed by the author.
ReplyDeleteI would love a "back" tutorial. I have two naked cushions waiting for crocheted covers that would be most grateful! I totally agree about the perfect projects probably not being oh so perfect. It really has to be a massively huge mistake in my knitting before I will rip something out. Love the cushion Sandra, beautiful as always, happy Easter. xx
ReplyDeleteThe cushion is adorable - why don't you like it? I think it looks the business on your chair (which would definitely look better in MY house..!) and the colours are fab!! Enjoy it ...... lol xxx
ReplyDeleteYes please for the cushion tutorial! :) It looks great Sandra, and again I really like the vintagey colours together! x p.s since I am such a beginner crochet-er my first blanket had loads of mistakes in, but it's actually my favourite and the one I use most!
ReplyDeleteI would like the tutorial too. Your cushion looks great, even with the different colors of cream :) I have done that too. I really try not to be a perfectionist about my crafting. Less stress!
ReplyDeleteOh yes, please, a tutorial! The one thing keeping me from crocheting a cushion cover is dithering around about how I would back the thing. I love your crocheted back. And your lovely giant granny as well; I'm making one of my own and it's currently at 37 rounds, whew, and it's beginning to feel like forrrrrrreeevvvverrrrrrrr to get all the way around . . .
ReplyDeleteçok şık ve kullanışlı yastık elinize sağlık..sevgiler.
ReplyDeleteA tutorial would be wonderful. I to stopped making fabric backs for pillows, after buying tons of sweaters at the thrift stores. Something about the yarn and fabric mix did not work for me.
ReplyDeleteBeautiful pillow!!!
blessings, jilly
The granny square looks perfect for a cushion. As always, I love your colors. My favorite picture is on the bench outside. I think the cushion matches perfectly with both blankets, the granny and specially the one with tiny flowers.
ReplyDeleteAna BC
I think it's quite nice! And a cushion back tutorial would be great!
ReplyDeleteYes please, I finished a cushion the other day which I was very proud of but the back was a disaster and I had to botch it together. It looked fine in the end but I'd rather have another method!
ReplyDeleteYour cushion looks lovely by the way.
Oh yes please to the tutorial! I'm currently trying to jazz up the settee so it would be very useful. I love both of your grannies. I've just started a giant granny this week so your finished ones are great to keep me inspired.
ReplyDeleteIt is a beautiful cushion!! A tutorial for the cushion back would be great!! What size hook did you use for the cushion? Hope you have a wonderful Thursday!! xo Heather
ReplyDeleteYour cushion is gorgeous Sandra :-)
ReplyDeleteI'd love you o post your pattern for the cushion back - it looks fab and I like the idea of no buttonholes.
ANY of your patterns would be greatly appreciated.
Have a lovely Easter.
Carole x
I'd LOVE a tutorial on cushion backs! I really like the look of how you've done it. (Actually, the whole cushion looks pretty fab :) )
ReplyDeleteA cushion back tutorial would be heavenly - oh yes please!! I want to make a set of four for my sofa but I don't know how you did the back!!
ReplyDeleteYes Please to cushion tutorial!
ReplyDeleteI'd love to see a tutorial! I have 4 cushions that I'm working on fronts for, but haven't even thought about backs yet!
ReplyDeleteOh yes...... a cushion back tutorial would be AWESOME!
ReplyDeleteI love the cushion and I couldn't see the colour mis-match in the photo's and anyway if it's on the back who cares it looks lovely!
ReplyDeleteI think a tutorial would be fab. I've been put off doing cushions because I am a lazy toe rag too!!I just cannot be bothered to sew fabric onto the back of a cushion so I've bever made one. That's really lazy isn't it!
Your garden photo is lush by the way.
x
Adorei a almofada!Gosto muito de crochetar square,as cores diferentes me deixam mais alegre.Veja em meu blog:http://tesourosdacaca.blogspot.com, as minhas almofadas.Espero que você também goste.Bjos.
ReplyDeleteI love this (and your large grannie blanket). I have a square cushion filler crying out to be put to good use, so I for one would really appreciate a tutorial. :)
ReplyDeleteBeautiful as always and I really like the colours, you have a very good eye. I'm laughing at the difference in the colours of the cream yarn at the back and thank you for sharing. My Mum always used to say "A man on a galloping horse wouldn't notice it" so I totally agree, never worry about it. And yes please, pretty please can we have a tutorial for the back!
ReplyDeleteHelen xx
Hello Sandra,
ReplyDeleteomg.. i would love to see you make a tutorial on the back!
infact i have several squares ready and i have no idea how to even get started to make the back for a pillow.
Any help with some photos would be very much appreciated.
Thank you
Claudia
A tutorial would be wonderful Sandra - especially if it means no sewing machine! I love your cushion - it invokes lovely warm memories and feelings.
ReplyDeleteTutorial YES PLEASE! I've got a cushion front waiting for a back and I'm stuck!
ReplyDeleteYep! Sign me up for a tutorial too, please!
ReplyDeleteIt's funny how things work out, isn't it? But I think your cushion is just lovely.
Xx
I think your granny cushion is lovely and am definitely of the mindset that anything handmade should not have to be perfectly perfect. Just the fact that something is made by hand makes it perfect enough for me. Best wishes, Tammy
ReplyDeleteWould love a tutorial!! xo Silvia
ReplyDeleteI think the Granny Cushions is absolutely lovely! I love the back (it could easily be a "front" with those pretty buttons!) and would really like to see a tutorial.
ReplyDeleteI would certainly love a cushion back tutorial. I have two pillow forms just waiting for a pretty granny covering.
ReplyDeleteI would find a cushion back tutorial extremely useful! :) Thanks in advance ;)
ReplyDeleteI love the colour combination... .i would vote for a cushion back tutorial... :)
ReplyDeleteI absolutely adore the colours you use!! The yellowish colour really transforms it into a modern-vintage, if you know what I mean :D
ReplyDeleteI would love a tutorial on the crocheted cushion back as well as a border around the cushion!
yes please for the tutorial cushion back, it's just what I need...my cushion is almost identical (larf).
ReplyDeleteSue
The cushion is gorgeous and yes, I'd really appreciate a tutorial on how to do the back.
ReplyDeleteJust found your blog and I'm loving it.
Margaret